Epiphany
Help
Getting to Know Epiphany� System
Requirements� Installation� Main Menu� Entries� Entry Types� Collections� Symbols� Attachments� Locations� Export Data� Backup / Restore
Change Password�
About� Record Control and Command Buttons� Record
Selectors And Search Fields� Uninstalling Epiphany� Getting Support�
Reporting Bugs and
Special Offer for Beta Testers
Epiphany helps you record, correlate and make sense out of the
events that make up your life and your spiritual path. You can arrange your
journal entries, dreams, synchronicities, signs, visions and many other types
of Entries into Collections of Entries that are related to each other or
contain the same Symbols. Attachments allow you to relate hyperlinks, photos,
documents and other files to your Entries, allowing you to quickly reference
and view material related to your Entries. The Standard Edition of Epiphany
comes with many of the most commonly used Entry Types, such as dreams, visions,
journal, divine revelation, research, inspiration, predictions, bible study,
goals and other. The Deluxe Edition of Epiphany contains additional Entry Types
and allows you to create an unlimited number of your own custom Entry Types.
Please read the Help section for the
Entries form to become familiar with the functions and behavior that all of the
Epiphany forms use.
Main Menu
You can open the various Epiphany forms from the main menu by
clicking the command buttons on the left side of the main window or by clicking
on the links in the upper left portion of the ribbon above. The forms will open
in tabs along the top of the main window allowing you to quickly switch between
them.
Entries are individual records of various types of events and
information that form the foundational records of Epiphany. There are various
Entry Types that allow you to record details about different types of events
and data, such as dreams, visions, synchronicities, meditations, studies,
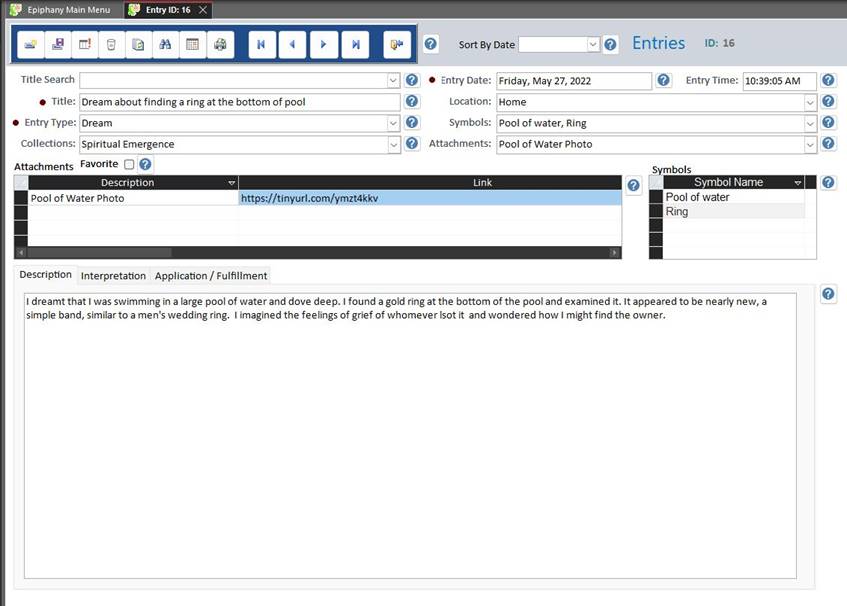
journal / diary entries, and more. The Entries form is shown below.
Please become familiar with the operation of the Entries form and
its controls as this will familiarize you with the operation of all of the
other forms.� Additional Help is
available for all controls and can be accessed by clicking the blue question
mark button to the right of the control.
Searching
for / Finding Entries
The Title Search
dropdown list allows you to find and select your Entries. The Entries are
sorted in alphabetical order, with those marked as Favorites list first. You
can click the down arrow on the right side of the dropdown and scroll down to
find an Entry or type in the first few letters of the Entry Title do get
matching results. You can also search for text in all fields of Entries by
clicking the Search command button on the form header
with the binoculars icon. Entering the text to search for in the Search
text box on the bottom of the form next to the record navigation arrows
searches the current active Entry record for the text you enter.
Entry
Title
When creating a new Entry type a unique description for it in the Title text box.
Entry Type
Select an Entry Type from the dropdown
list.
Collections
You can select one or more Collections
to add the Entry to from the Collections
dropdown list and checking the box to left of the Collections you want to add
the Entry to. You can also leave the default Collection (None) selected if you
do not wish to add the Entry to a Collection. Double clicking the Collections
list will open the Collections form with a new record so that you can create a
new Collection for the Entry. When you return to the Entries form you will need
to click the Refresh command button on the form header for the new Collection
to appear in the Collections list.
Entry Date
and Entry Time
The current date and time will populate the Entry Date and Entry
Time fields when you are creating a new Entry record. You can select a date
manually by floating the mouse pointer over the ride side of the Entry Date
field, or enter a date manually with your keyboard.
Location
You can select one or more Locations to
add the Entry to from the Locations
dropdown list and checking the box to left of the Locations you want to add the
Entry to. You can also leave the Location� blank if you do not wish to associate
the Entry with a Location. Double clicking the Locations list will open the
Locations form with a new record so that you can create a new Location for the
Entry. When you return to the Entries form you will need to click the Refresh
command button on the form header for the new Location to appear in the
Locations list.
Symbols
You can select one or more Symbols to add
the Entry to from the Symbols
dropdown list and checking the box to left of the Symbols you want to add the
Entry to. You can also leave the Symbol� blank if you do not wish to associate
the Entry with a Symbol. Double clicking the Symbols list will open the Symbols
form with a new record so that you can create a new Symbol for the Entry. When
you return to the Entries form you will need to click the Refresh command
button on the form header for the new Symbol to appear in the Symbols list.
Attachments
You can link photos, images, audio files, videos, web pages,
documents and other types of files relevant to the Entry.� Attachments can be
files on your computer or URL hyperlinks to web pages and other online content.
You can select one or more Attachments to add the Entry to from the Attachments dropdown list and checking
the box to left of the Attachments you want to add the Entry to. You can also
leave the Attachment blank if you do not wish to associate the Entry with an
Attachment. Double clicking the Attachments list will open the Attachments form
with a new record so that you can create a new Attachment for the Entry. When
you return to the Entries form you will need to click the Refresh command
button on the form header for the new Attachment to appear in the Attachments
list. Associated Attachments will appear in the Attachments subform.
You can open an Attachment by double clicking the Link field in the Attachments
subform. Double clicking the Description field for an
Attachment in the subform will open the Attachments
form with that Attachment record displayed ready for you to edit.
Favorite
The Favorite check box will mark the Entry and place it at the top
of the Title Search dropdown list along with other Entries marked as Favorite.
This will help you quickly located Entries that you use often or want to
quickly find to edit for recent Entries you have created. Check the box to mark
the Entry as a Favorite.
Entry
Details Tabs Subform
The details about the Entry are entered into the text fields
located on the tabs on the bottom portion of the Entry form. The number of tabs
and their labels will change depending on the Entry Type chosen. You can use
Rich Text in the Entry Details tabs. When the cursor is in the large memo field
on one of the tabs the Rich Text ribbon control on the ribbon above the forms
windows will become active allowing you to modify the font, fonts size, add
bullet point, and otherwise format the Entry details. Double clicking within an
Entry Details tab will also bring up an floating Rich
Text dialog to allow you to choose text formatting options.
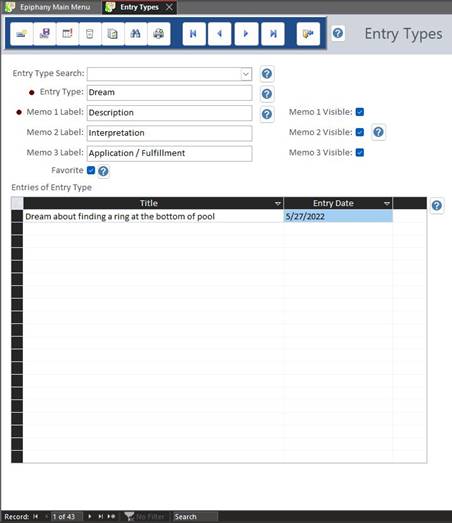
Entry Types
There are a number of predefined Entry Types that you
can assign to Entries. Epiphany Standard Edition includes Entry Types for
dreams, visions, journal entries, goals, synchronicities, prophecy, signs and
more. Epiphany Deluxe Edition includes many more Entry Types and allows you to
create and define an unlimited number of custom Entry Types. Select the Entry
Type for an Entry using the dropdown list labeled Entry Type on the Entries
Form.
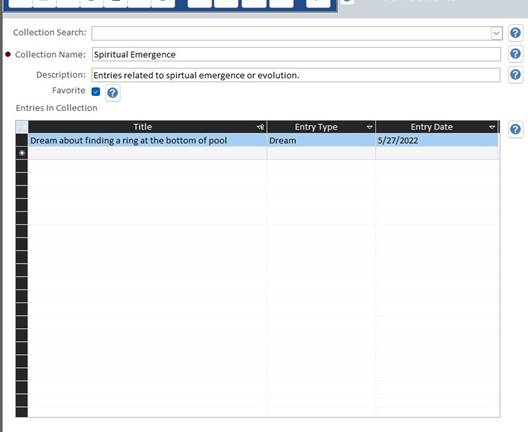
Entries can be grouped into Collections that you
define. Entries in a Collection can be related to each other by subject or
theme to help you correlate them. The individual Entries in a Collection can be
of different Entry Types. For instance, you may create a Collection named �Family� to group Entries related to your
family together.
Select the Collection(s) for an Entry using the
dropdown list labeled Collections on the Entries Form. An Entry can be included
in multiple Collections. The default selection is (None), which does not
include the Entry in a Collection. Double clicking an Entry Title in the
Entries in Collection subform will open the Entries
form with the selected Entry shown.
Collections are created and managed using the Collections
Form, shown below.
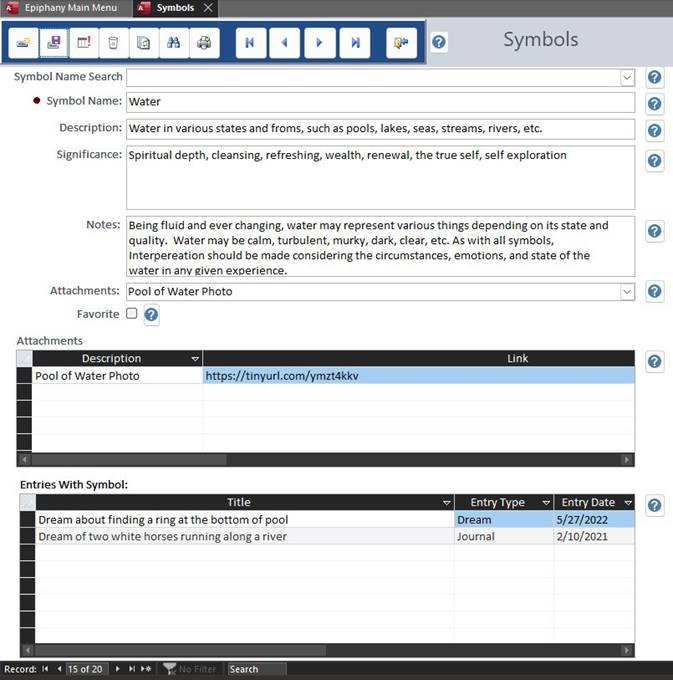
The Symbols form allows you to define Symbols that can be
associated with Entries. Symbols may include names, objects, numbers, places,
animals or anything else that may be symbolically significant related to your
Entries.� Here you define new Symbols
with a unique Symbol Name, Description (if desired), Significance or meaning of
the Symbol, Notes about the Symbol and you can associate Attachments
with the Symbols as well. Attachments may include image files, photos, audio or
video files, or webpage hyperlinks. Associated Attachments will appear in the
Attachments subform. Double clicking an Attachment
name in the subform will open the Attachments form
with the selected Attachment record displayed. Double clicking the Link field
for an Attachment in the subform will open the
Attachment file or webpage.
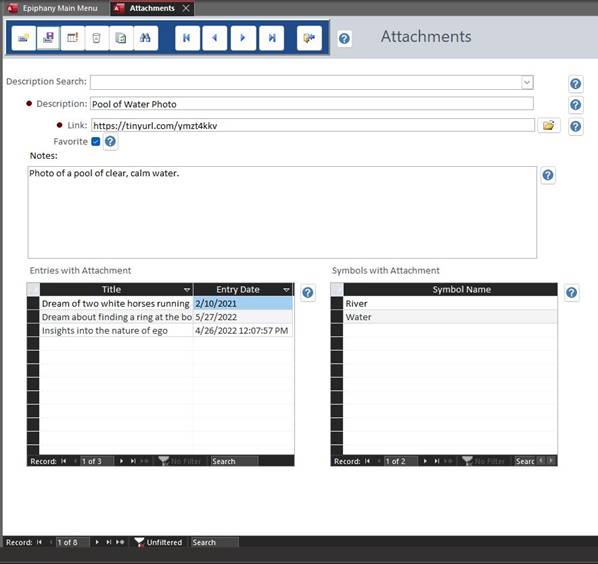
The Attachments form is where you create Links to files and
webpages. The Description Search dropdown list functions the same as all other
lists on other forms. Enter a unique Description for a new attachment record.
To select a file as an attachment click the file folder icon to the right of
the Link text box then navigate to the desired file using the standard Open
File Dialog box. To use a URL / hyperlink as the Attachment copy and paste the
hyperlink into the Link field. The subforms below
show the Entries and Symbols that the active Attachments record is associated
with. Double click an Entry or Symbol in the subforms
to open the Entries or Symbols form with the selected item displayed for
editing.
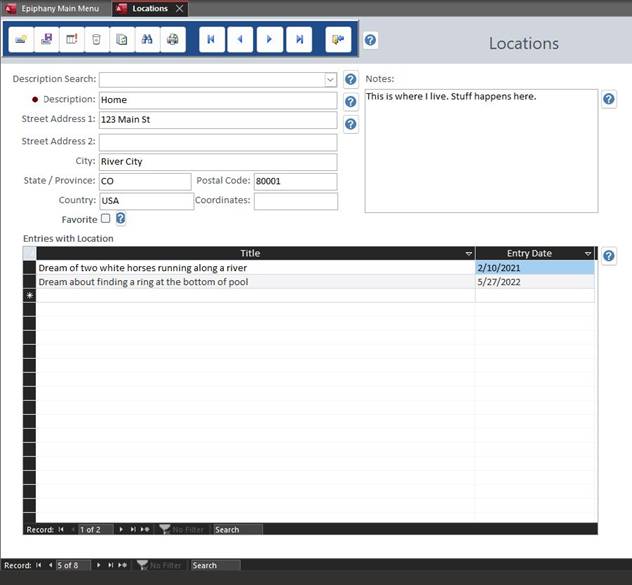
Locations are managed in the form shown below. Enter a unique
Description for a new Location and add the additional details that may apply to
the Location. Entries that have the active Location record associated with them
are shown in the subform below. Double click and
Entry item in the subform to open the Entries form
with the selected Entry displayed for editing.
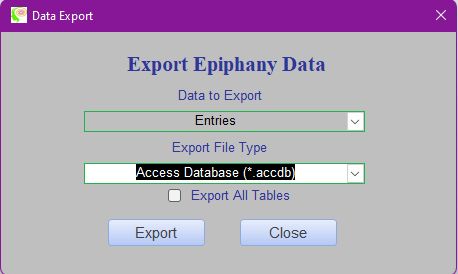
You can
export your personal Epiphany data to several file formats, including: Access
Database, Comma Separated Value (*.csv), Excel Spreadsheet (*.xlxs), HTML (*.html). and XML (*.xml).
Select the
desired Export Data file format from the Data to Export dropdown list. If you
are export to Access Database format select the table you want to export, or
check the Export All Tables check box to export all tables.
Click the
Export button and select the folder location and filename from the Open File
dialog. Click the Save button to export the data or Cancel.
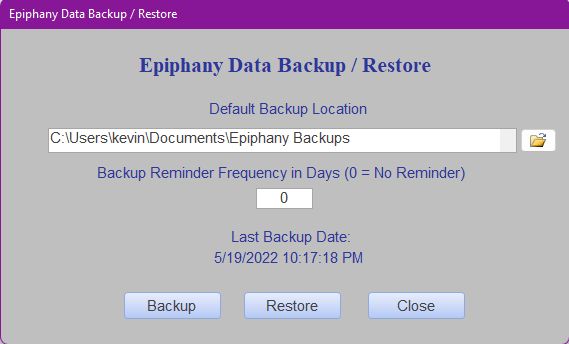
Backup / Restore
You can backup and restore your Epiphany data and set the backup reminder
frequency from the Backup / Restore form below. If you wish to change the
default backup location click the folder icon to the
right of the Default Backup Location text box.
The backup reminder frequency in days is set in the Backup Reminder
Frequency text box. When the number of days since the Last Backup Date exceeds
the Backup Frequency value, you will notified and
asked if you want to backup when Epiphany starts.
Enter 0 for the Backup Frequency Reminder value if you do not want to be
reminded to Backup when Epiphany starts.�
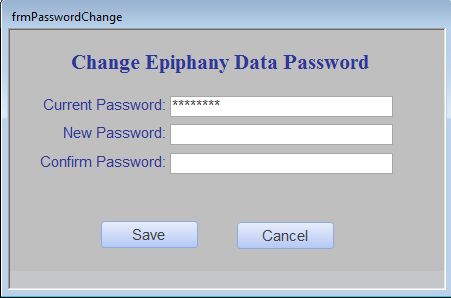
You can set or
change your current password by clicking the Change Password button on the Main
Menu. On the form shown below, enter your Current Password. If you have not set
password leave the Current Password field blank. Enter and confirm your new password
as indicated and click the Save button.
To remove password
protection and decrypt your data, enter your Current Password and leave the New
Password and Confirm Password fields blank and click the Save button. You will
no longer be prompted for a password when Epiphany starts and your data backups
will no longer be encrypted. This
does not decrypt backups that were created when encryption and password
protection were enabled.
!!! IMPORTANT NOTES ON PASSWORD
PROTECTION AND ENCRYPTION!!!
When you set a password your data will be encrypted and you will be
prompted to enter your password each time you start Epiphany.
If you forget your password there is
no way to recover your data or run Epiphany! Please be sure to store your
password in a safe location or choose one that you will remember.
Any
Epiphany data backups that are done after you set a password will also be
encrypted and password protected.
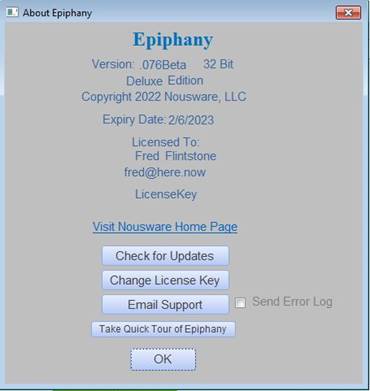
Clicking the About command button on the Main Menu with open the
About form shown below. Information about your copy of Epiphany is shown here,
including the version, bit level (32 bit or 64 bit
version), edition, expiry date and license key.
You can manually check for updates by clicking the Check for
Updates button. To register a License Key click the Register License Key button
and the Registration form will open allowing you to enter the Key. If you
should need support you can click the Email Support button and an email message
will open populated with support email address and basic message information Nousware Support will need to help you with your issue. If
you are requesting technical support related to an error message leave the Send
Error Log check box checked and the Epiphany Error Log will be attached to the
email. Nousware Support will need the attached error
log to assist with the problem. Also please include as much detail about the
problem as you can, such as the from you are using, and what field or function
you are using when the error occurs. To view the Quick Tour intro presentation click the Take Quick Tour of Epiphany button.
Record
Control Command Buttons
Navigate and manage records using the command buttons in the
Record Control box to the left. The button functions from left to right are New
Rerord, Save Record, Undo Record changes, Delete
Record, Refresh Record, Find / Search for Record, Print Entry (Entry form
only), Go to First Record, Go to previous record, Go to Next Record, Go to Last
Record, and Close the form.

Record
Selectors and Search Field
The Record Selector bar is found at the bottom left of each form.
You can navigate to the first record in the database by clicking the left arrow
with the vertical bar to the far left, navigate to the previous record by click
the left arrow just to the left of the record count, go to the next record by
clicking the right arrow to the right of the record count, go to the last
record by clicking the right arrow with the vertical bar and create a new
record by clicking the right arrow with the starburst. You can search for text
within all fields of the current active record by entering the text to search
for in the Search field. To search for text in all records in the database
click the search button with the binoculars icon on the command button ribbon
at the top of the form.
![]()
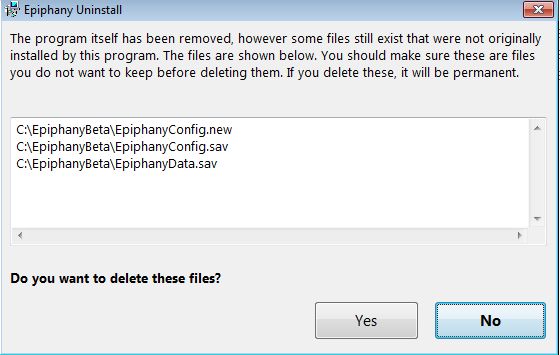
To uninstall Epiphany click the Uninstall
item in the Epiphany Program Group found in your Windows Menu > All
Programs. You will be prompted with an important warning about uninstalling
backup copies of your data and configuration files. Please read the dialog
carefully before proceeding. If you choose to delete the files you will Not be
able to recover them unless you restore them from a backup of your own. If you
do not delete the files your data and configuration will be available if you
reinstall Epiphany. To preserve your data and configuration click on the No
button as seen in the dialog below.
If you
need technical or customer support you can sue the Email Support button on the About form or
send an email to support@nousware.net. Please
include detailed information about the error or issue that you require
assistance with.
Reporting
Bugs and Special Offer for Beta Testers
Beta testers can report bugs or make
suggestions for Epiphany feature improvements by sending details via email. To
send us your feedback open the About form and
click the Email Support button or send an email to support @ nousware . net. If you are reporting an error or bug leave
the Send Error Log check box checked. All Beta testers who contribute to the
improvement of Epiphany will receive a one year free subscription to Epiphany
starting from the first installation date of the Beta Version of Epiphany on
your PC. Thank you Beta testers for your participation and support! We
appreciate you!